For the last 30 years I have done the majority of my work with a 4x5 view camera. Industry changes over the last few years have made it increasingly more difficult to remain true to my large format heritage. Most labs in my city that could process large format film have gone away. Those that remain don’t do large format anymore. On one of my last trips I had much of my exposed film damaged by airport scanners. Even purchasing film has become increasingly difficult as local shops no longer carry it. Film costs have risen. Processing costs have risen. I now estimate my per exposure expenses at about $10.
Even with things conspiring against large format, I am so in love with the quality of my final prints and the process of using a view camera that I have not been able to imagine a future photographing any other way. But the world is changing and even if we are not forced to move into the digital realm maybe there are reasons to work with these new technologies. Maybe it’s not all bad.
Before developing a workflow one needs to know what the desired endpoint is. The person who is creating 1024x768 pixel images to post on a photo sharing site will have an entirely different set of goals from the person creating large images for print. The selection of tools and processes may be quite differrent. But it should be kept in mind that you can always repurpose an image that was originally intended for large print output to be posted to a photosharing site. The converse is not usually true.
Some of the qualities I want in my images are:
"Sounds like Large Format Film." Exactly! But how do you work with a reasonable cost digital camera and get large format film quality? This has been the question that I could not answer and the thing that kept me from moving toward digital capture. There are two attributes of digital cameras that have been problematic for me.
My goal is always large print output (20x24 and larger.) Maintaining orthogonal lines when shooting with a fixed lens-film plane camera means that you will probably be distorting the final images somewhat. Immediately these two goals dictate that the source images contain a great deal of information.
Digital cameras have a smaller dynamic range than film. According to my sources the typical range of a DSLR sensor is roughly 8.5 stops. Compare that to negative film with a typical useable range of 11 stops and you can see that there is some disparity. Although there is plenty of information available to argue these numbers, it is generally accepted that film exceeds digital capture and my purpose here is to find a workflow that produces results which, at the very least, do not fall short of film.
With lots of experimentation, and some really wonderful tools, I have found a workflow which produces stunning large prints that have all the "nose to the print" detail and shadow/highlight separation I could ask for. In short a digital SLR with a panorama head, stitching software and HDR processing.
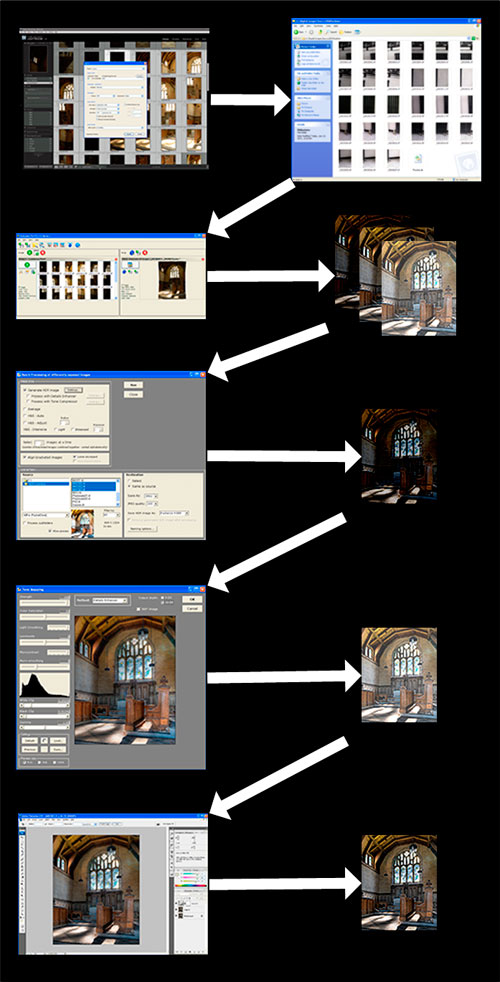
The general workflow is:
Here is a more detailed description of my workflow. Please keep in mind that this is a generalized workflow and it may be deviated from for any individual image at any time
| Export from Lightroom to 8 bit TIFF files. | |
| Import the 27 frames into Autopano and create 3 separate panoramas. One for each exposure value. | |
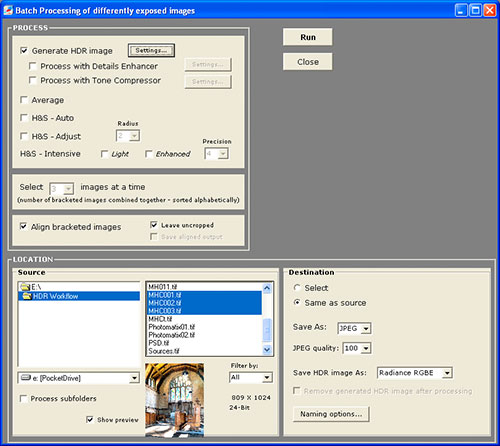
| Use the Batch processing feature of Photomatix to create a single HDR image from the three panoramas | |
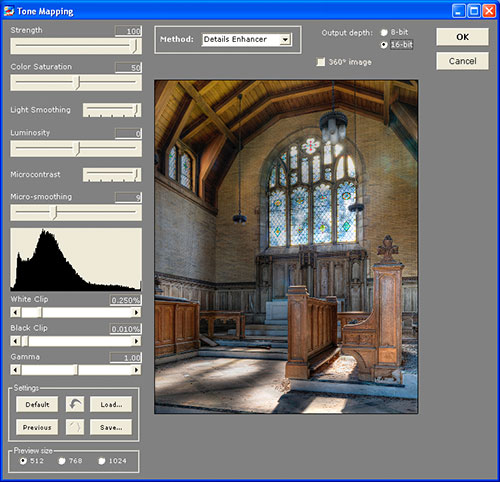
| Use the large file mode of Photmatix to Tone Map the HDR image. Output to single TIFF image. | |
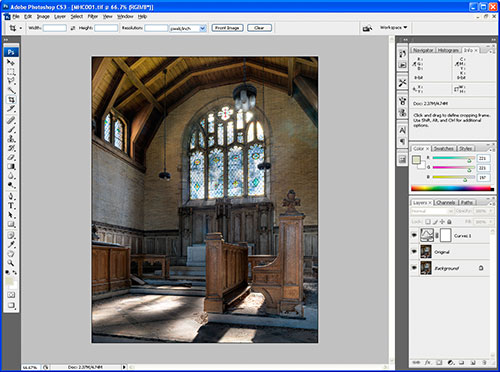
| Import the Tone Mapped image into Photoshop and make final adjustments/corrections. |
Since the objective is to produce prints with the highest level of detail possible I have made a practice of shooting in RAW only. While many people have suggested that the difference in RAW vs JPEG is negligible my experience has left me with a different opinion. RAW preserves more detail and sharpness in the resulting image after conversion than JPEG.
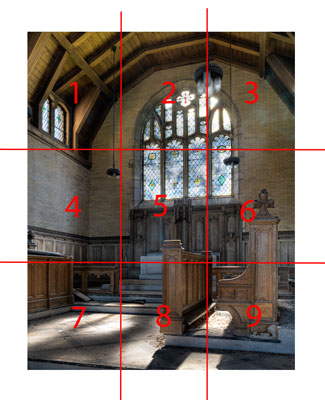
I mount my camera on a spherical panorama head and shoot a mosaic of 9 overlapping frames. There is boatloads of information on the Internet about how to create panoramas using a panorama head. A mosaic just extends the concept to multiple rows and limits the field of view to that of a normal rectalinear lens.
The concept is to compose your image and then divide it into 3 rows by 3 columns and shoot one higher resolution frame of each of the 9 pieces
The lens I use most is a Tamron 17-50mm f/2.8 zoom. The beauty of this focal length range is that it’s about a 3 to1 ratio. That means that I can compose at 17mm then zoom in to 50mm and capture my 9 overlapping frames with the same resulting angle of view. This nearly triples the number of pixels captured in each dimension. In theory you are looking for a 20% overlap in frames so the actual factor is more like 2.8 but still a major improvement over single frame images.
Increase Dynamic Range by shooting 3 exposures of each frame. One at 2 stops under, one right on and one at 2 stops over. This is a general rule of thumb because every scene could have an entirely differenct dynamic range that you want to capture. Some people will shoot 5 exposures covering 4 stops under to 4 stops over. For me that is usually too much and would result in shooting 45 frames for any one image. On occaision it might be necessary.
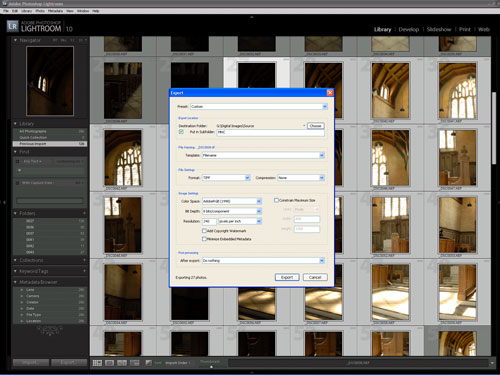
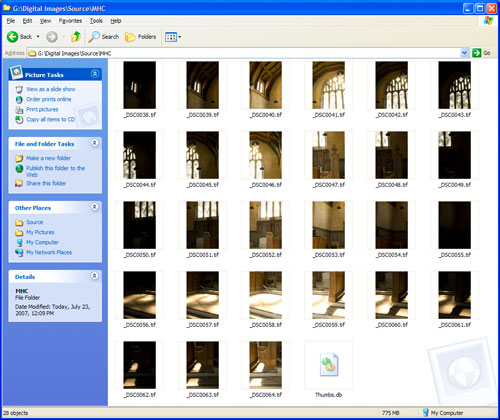
Autopano can use RAW files but I have found that converting to TIFF first makes the export to separate exposure values much easier. I use Adobe Lightroom. I select the 27 frames and export them to their own directory just to help keep things organized
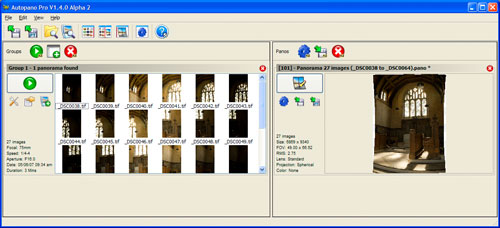
Next is to stitch all the frames together. Stitching is the process of combining the 9 overlapping frames into a single image. Actually we want to create 3 images from our 27 exposures, one image for each of the three exposure sets. This would be nearly impossible without a tool like Autopano Pro. Autopano will take all 27 image files and group them by exposure then align them, warp them and blend them into 3 larger images of the original scene automatically. Well automatically most of the time. Sometimes you need to help it a bit but it is really really good at doing most images all by itself
Load the source images into Autopano Pro and let it autodetect the panorama.
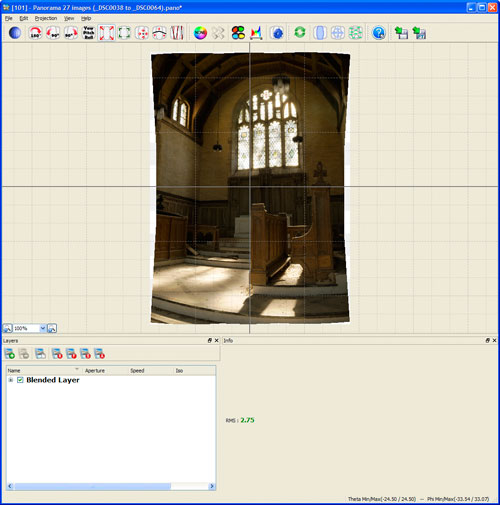
The default projection will be Spherical. For some images this might be fine but for most images that were meant to be rectilinear you will want to choose the appropriate projection of Planar
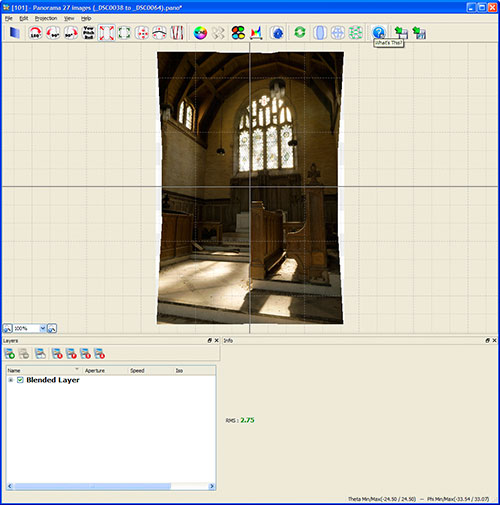
Once the projection is changed you can see that straight lines are straight once again.
Autopano will automatically blend the three different exposures into a single panorama. This is not what I want so the next step is to split the image into separate layers One for each exposure grouping. It’s important to also change the rendering options to produce separate image files.
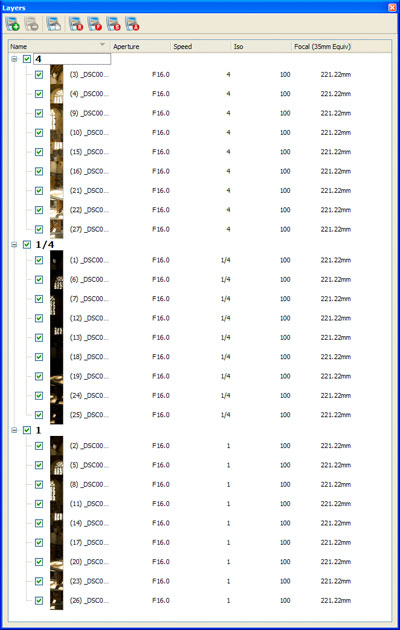
If you leave the layers to the default Autopano will do a very good job of blending the esposures. My goal is to have more control over the process so I make sure to create 3 separate layers grouped by speed.
After the three separate panoramas are rendered I use Photomatix Pro to generate a HDR file. Photomatix can’t handle file sizes this large in it’s default mode so you need to process the images in batch mode.
The resulting HDR file is then Tone Mapped in Photomatix. This is a separate operation. Again, Photomatix can’t handle a file this size in it’s default mode so you need to make sure that large file mode is selected. The tone mapping options are completely dependent on your personal preferences and each image will require different settings so I won’t try to describe how each is used but I will say that I almost always keep the light smoothing set to it’s highest level. Anything else seems to produce unnatural results.
After the tone mapping is complete I save the results to a 16 bit TIFF file and open the file in Photoshop. The output from Photomatix can look very low contrast and have an overall gray appearance. For me, correcting the tonality of these files is the greatest challange. To correct the poor local tonal separation I copy the background to a new layer and apply an unsharp mask with settings of 20% to 30% and a radius of 70 or 80 pixels. I then use a layer mask and blend in only the parts of the image that require correction. I will usually import one of the original panoramas generated by Autopano as a layer and use this to help blend and define global tonal relationships.
Composing your image and releasing the shutter is where the image begins. What if you have to then adjust your focal length and use an mechanical apparatus to capture your image in sections, 27 sections?. For me there was always a certain satisfaction with finalizing my composition on the ground glass then clicking the shutter and knowing that I had got my image. Shooting mosaics is not quite like that. After you make your final composition you need to change your focal length and refocus the camera. Then you have to mechanically divide your image into sections and be sure to capture all 27 frames. If you aren’t paying attention and you miss even a single frame then you pretty much lost the shot.
Shooting with a view camera I am very used to spending a fair amount of time composing each image. The ground glass and polaroids give a pretty good idea of what you will end up with compositionally. Shooting with a DSLR and a panorama head you have to make certain image adjustments in your head because what you see through the view finder may not be what you want for your final image. You have to take into consideration that perspective and converging lines will have to be dealt with post capture and that means you may be throwing away a lot of image. It’s important to capture enough information that your image will still be intact even if you have to crop or distort. And some corrections simply cannot be made post capture.
Capturing 27 RAW images takes up much more space on your media than a single JPEG. On my D200 a single JPEG uses about 1.4 megabytes where each RAW iamge is a little over 15 megabytes. So on a 2 gigabyte compact flash card I can only capture enough frames for roughly 4 images with a little space left over. Of course with the increase in effort to capture each image I can only make 1 or 2 images every hour.
Another cost is the Hard Disk space required. for Each image there are 27 RAW files (415 MB0, 27 Tiff files (775 MB), 3 stitched mosaics (933 MB), 1 HDR file (235 MB), 1 tone mapped image (466 MB) and then my final PSD file (874 MB). This takes up 3.7 GB on my hard drive. Yes you can delete all the intermediate files but it’s important to know that you will be generating this much image data before you reach the final image.
All of this processing takes a great deal of time. While you don’t need to be sitting in front of the computer while all of the rendering is going on you will need to be around to kick off the processes and coordinate each program. I estimate that from import from the camrea to producing an image to be edited in Photoshop is about 4 hours. You certainly won’t be producing images in bulk this way.
One of the things I like about this approach is that it brings back the large format experience. It forces me to slow down and shoot methodically. Much the same way I would if I was using my view camera. Photography is about visualization and not equipment. Slowing down helps keep me in touch with that. It helps me concentrate on the visualization.
In this example I used a Nikon D200 but this process works equally well with non-DSLR cameras as well. I first started developing this workflow using my Canon A620. The first big prints I did with this workflow were of such a quality that I recognized the potential for using a camera with RAW caputre and finer controls. This was the catalyst for me to purchase a DSLR.
If the final image quality was mediocre or not significantly different from single shot images it would be really silly to go to all this trouble. The bottom line is that following this workflow produces images with biting clarity and beautiful highlight and shadow separation. Yes, more than I ever got with film. The results are simply stunning and well worth the effort for me.
So does this replace my view camera? Not exactly. Even though I find I can produce similar results it’s really a completely different tool and has to be treated that way. No matter what kind of image quality your tools are capable of they are still just tools and the responsibility to use them correctly lies with you the photographer.
For now I am content to explore the potential of these tools and don’t feel as though I have to commit to packing away my old ones forever. Who knows where I’ll go when full frame 4x5 digital backs become affordable.
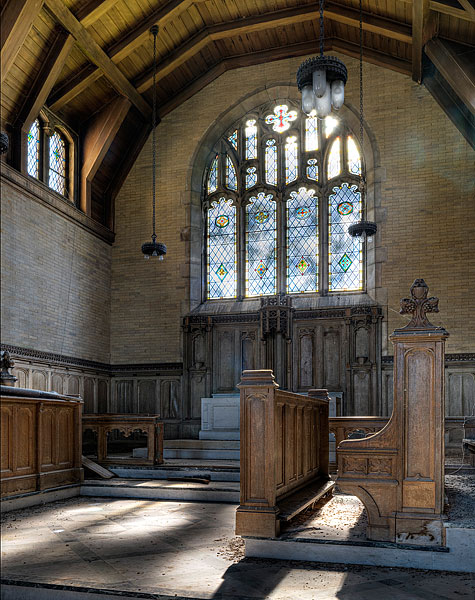
Final image 7355 x 9291 pixels
http://www.scotthendershot.com/Panohead/UniversalPanoHead.htm
http://www.scotthendershot.com/Panohead.asp
http://www.scotthendershot.com/IncreasingResolution.asp
http://www.pbase.com/philway/home_made
http://www.judyarndt.ca/pan5700/pan5700.htm
http://www.panoguide.com/howto/panoramas/panohead.jsp
http://www.chem.uky.edu/xray/people/Parkin/panohead/panohead.html
http://www.autopano.net
http://www.hdrsoft.com
http://stitcher.realviz.com/image-stitching-tutorials/stitching-tutorials/entrance-pupil-location.pdf
Finding the NPP of a lens: http://www.rosaurophotography.com/html/technical7.html
Return to Articles List