Sheas Theater 06
In the previous part I covered converting the RAW files and stitching them into larger bracketed images. In this part I am going to combine the seven bracketed images into a single HDR image ready for post processing in Photoshop.
 |
| Sheas Theater |
If you have arrived at this page without following through the previous parts of the example I will give you a bit of background.
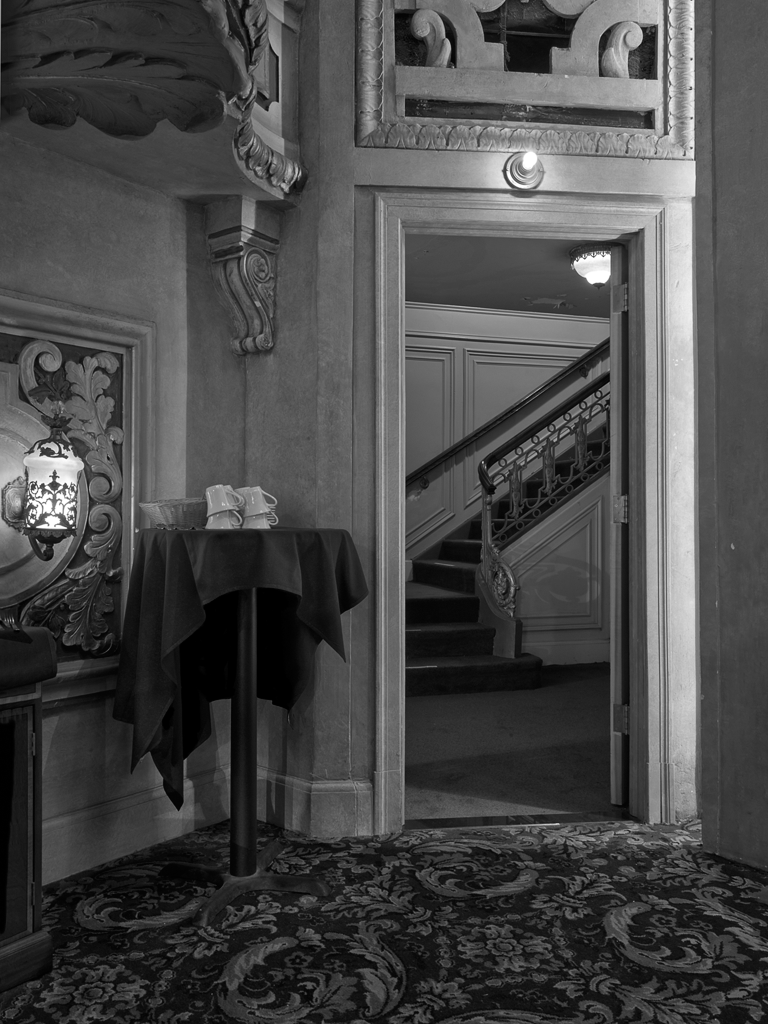
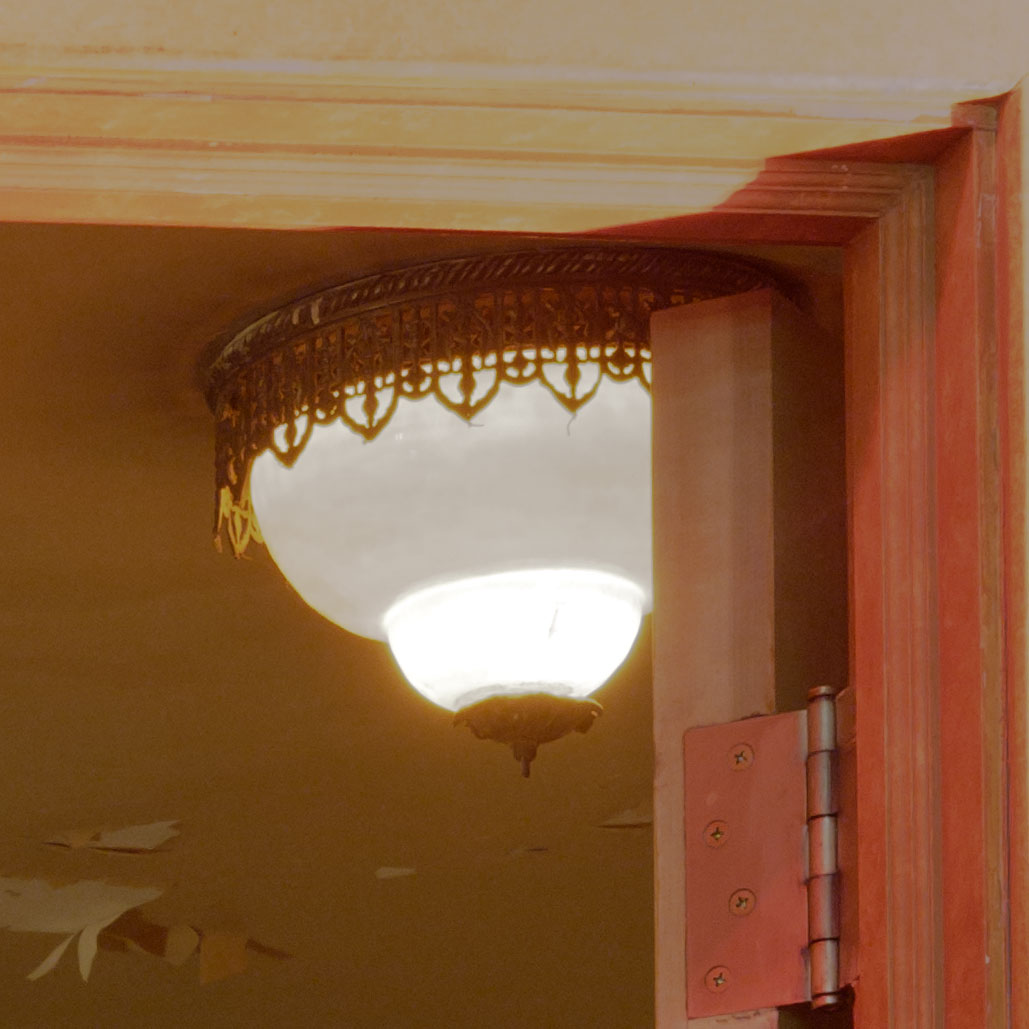
I have an image that is kind of a nightmare to edit. It's an interior scene in a dimly lit vintage theater. The dynamic range in the original scene is extremely wide having large areas in deep shadow and also areas strongly illuminated by colored lights. There are decorative lamps that are an important part of the image and I really need to be able to retain full color and detail in them while maintaining the subtle detail in the shadows.
 |
| Original Normal Exposure Image |
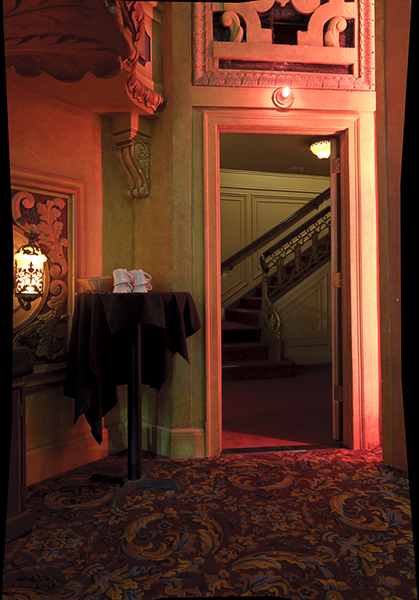
Another quality that makes this image difficult to work with is that although it was captured in color I wouldn't really call it a full color image. The predominant colors are red and yellow. In color there is plenty of separation in the image but in Black and White not so much. Looking at the luminance channel for this image you can see that there is little separation between much of the red and yellow areas and the image becomes very flat and lifeless.
Pre vs. Post Processing
The capabilities of Photoshop for editing images is extraordinary but it can only work with what we give it. Photoshop can't invent detail where it doesn't exist so I want to be sure to start with the highest quality source images I can. That means images that contain information from the deep shadows up into the highlights. Anything lost to clipping is lost forever.
For this example I will break the workflow into pre-processing and post-processing. Pre-processing will be what is done to produce the source image for editing in Photoshop. Post-processing will be all the edits done in Photoshop.
Keep in mind that edits in PS are destructive (yes layers help but ultimately every edit destroys image information). The goal of pre-processing is to produce the highest quality source image so that the least amount of edits are necessary.
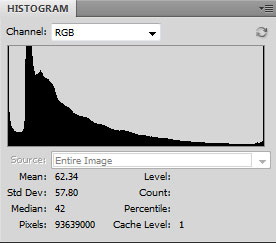
Image Brightness Range
From the histogram of the original image you can see that it is clipped in both the shadows and the highlights. There is no amount of editing in PS that is going to fix this. That image detail is gone. Knowing this at the time I captured the image I made sure to bracket with the intent of combining the images later to regain the full brightness range.
 |
| Histogram |
I use a few different techniques for combining bracketed images. One very effective method is to bring three separate exposures into PS as layers and mask each one so that it covers either the shadows, midtones or highlights. This method has the advantage that it is easily accomplished in PS without any plugins or additional software. The disadvantage is that it can be hard to create the masks to get the right transitions and it can be limited in the brightness range it can compensate for.
More often I will combine images using HDR software. If you are unfamiliar, HDRI or High Dynamic Range Images, are images encoded in a format that can represent a much greater range of image brightness. (see: http://en.wikipedia.org/wiki/High_dynamic_range_imaging)
This particular image is made up of 63 stitched and blended exposures. My usual 3x3 matrix but with 7 bracketed exposures per frame. To shorten things up I'm going to jump in here at the point where all the images are already stitched. If you are unfamiliar with stitching please see http://www.scotthendershot.com/thoughtsonadigitalworkflow.aspx for an explanation of my workflow.
After stitching - each of the bracketed images is 788MB in size and about 8500 x 12500 pixels. That's 5.5GB of image data for the seven images. I have not been able to use these images at their full size since I have not found any HDR application that can handle them. My favorite HDR program - Dynamic Photo HDR - is a 32 bit application and it just can't deal with images this size. Photomatix hasn't been reliable with this much data and even 64bit Picturenaut runs out of steam. Photoshop can actually process this group of images but it's HDR Tone mapping is subpar with artifacting that makes it unsuitable for my work.
 |
| HDR Artifacts in Photoshop CS5 |
Usually what I have to do is create the HDRI in Photoshop and then resize it to something manageable that can be tone mapped in another application. If I resize to about 20x24 at 300ppi I get a file size that can most times be rendered in DPHDR. Sometimes DPHDR won't handle it so I fall back to Photomatix or Picturenaut but usually one of the three will work. The down side to down sampling is that I have now limited my maximum print size. My originals could print at 30x40 inches with 300ppi resolution but after down sampling I'm limited to roughly 20x24 inches. Additionally some of the fine details of the original are lost in the process. Not the worst thing in the world but I would rather keep my options open and my original files intact.
Recently I was given the opportunity to participate in the 64bit beta of Oloneo's PhotoEngine. I'm always interested in trying new tools. Especially when there is the promise of being able to handle my massive images.
PhotoEngine is an powerful HDR application that is surprisingly easy to use. It is truly real-time and you instantly see the effects of all your adjustments.
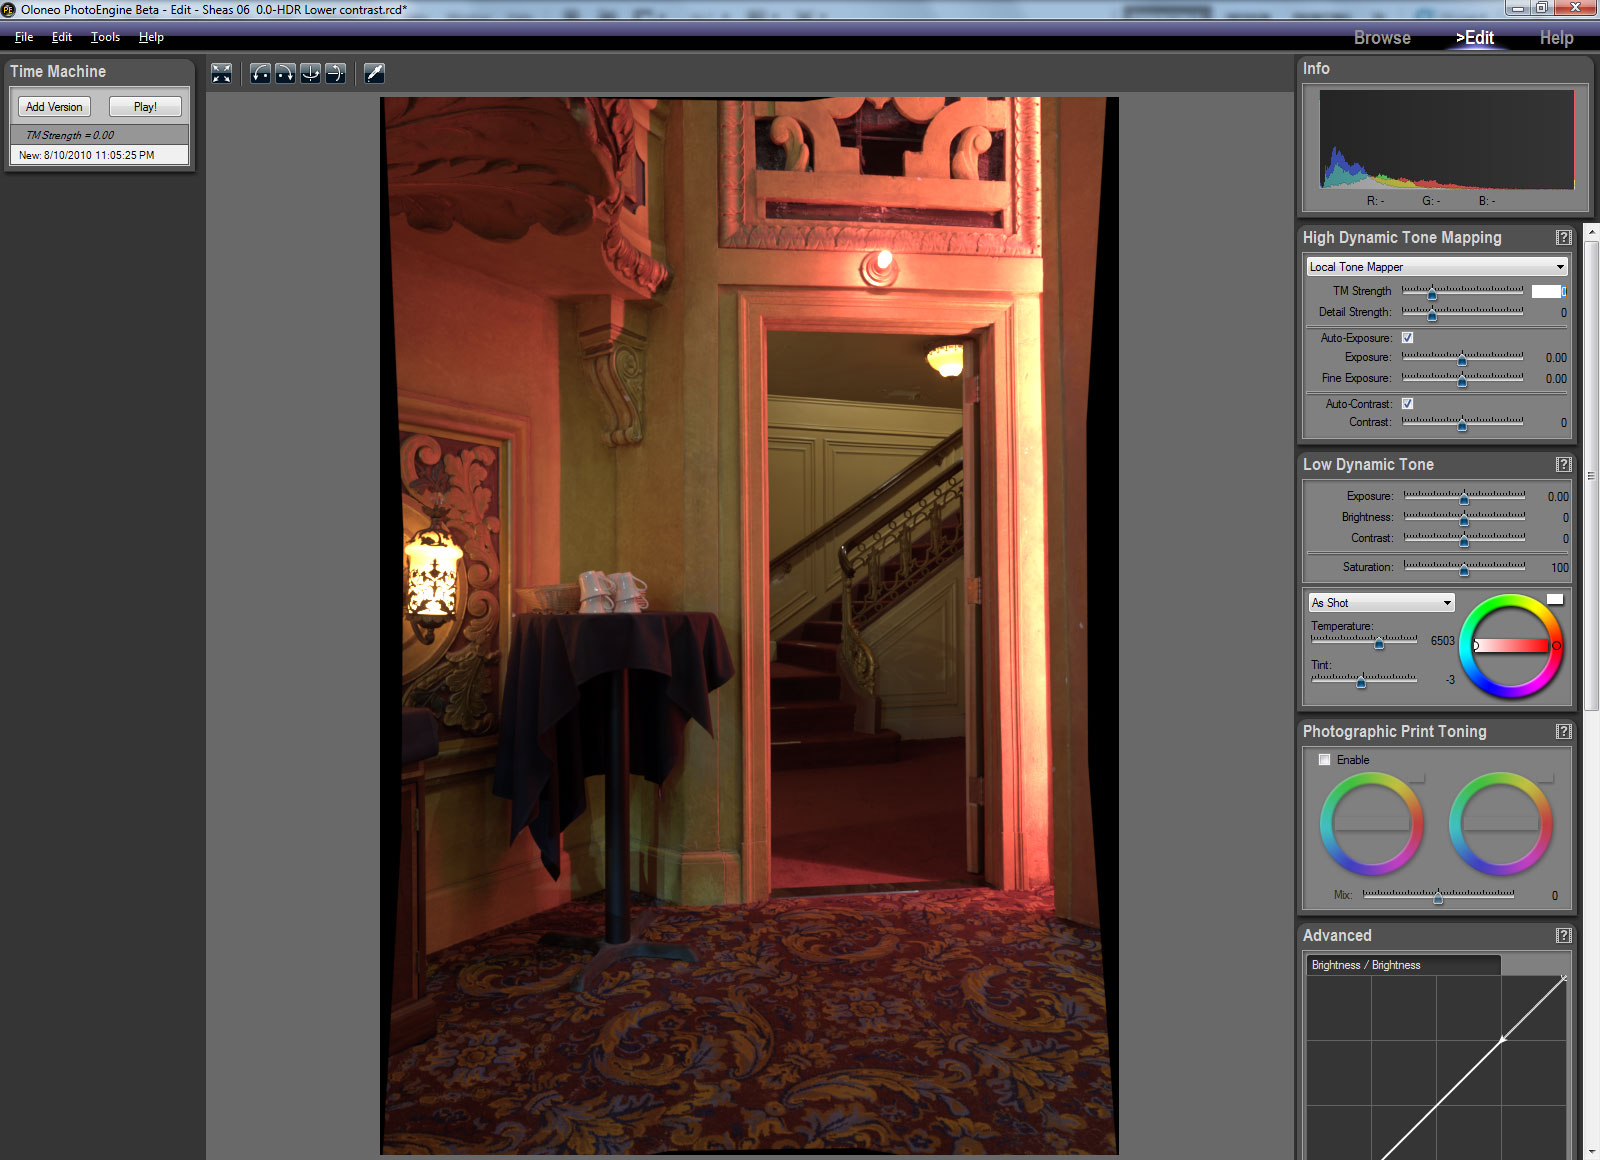 |
| PhotoEngine with 7 8500x12500 pixel images loaded |
PhotoEngine loaded and combined the seven 8500x12500 pixel, 788MB images in about two and one half minutes and then presented the result in its' real-time HDR Tone mapping interface. I was stunned to see my full size image in HDR for the first time. I did not have an instruction manual but fortunately the interface is presented with a logical layout and with very intuitive controls.
The first control "TM Strength" adjusts the Tone Mapping strength. This single control is very powerful and even small movements of this slider create large changes in the tonal distribution and compression of the image. For this particular image I wanted to create a natural look but with a full range of tones so I found I did not need to increase the Tone Mapping strength all that much. You can easily achieve the overcooked HDR look with this slider if you want but the amount of control here is amazing.
Local Contrast
One of the unwanted side effects of HDR Tone mapping is the lack of local contrast. This often shows up as a hazy or flat image. I often use different tools in Photoshop to counteract this loss of local contrast. PhotoEngine addresses this with the Detail Strength slider. Adjusting this slider will increase or decrease the amount of local contrast in the image. I find that most digital images benefit from some increased local contrast but you need to be careful not to overdo it. I found that adjusting the Detail Strength while zoomed fully out left me creating some visible halos when you would look at the image at 100%. Zooming in to 100% and checking several different areas of the image really helps in setting this slider correctly.
 |
| Halos from dialing in too much Detail Strength |
So far I have only adjusted the Tone Mapping Strength and the Detail Strength and I already have a great source image to feed to Photoshop. I was tempted to stop here and save the output to TIFF and get right to my editing in Photoshop. But keep in mind that the better the quality of the image you start with the better the quality you can achieve with post processing.
PhotoEngine has a really nice history feature that is tracking all of your changes as you make them. Using this history makes it a snap to go back to any point in time should you make edits that you don't like. So I decided to try to produce the best version of this image that I could before sending it to Photoshop. It's also easy to save any intermediate edits with little penalty of disk space so if there as a particular edit you want to be able to return to you can.
This was a very dimly lit room I wanted to preserve some of that feeling without compressing the shadows too much. I made an additional tweak to the brightness slider.
PhotoEngine also has some nice controls for modifying the luminance and saturation of individual color ranges. This image has strong colors in the red and yellow ranges. I thought it would be an improvement to create a bit more separation between them so with a quick adjustment in the luminance sliders I brought up the brightness in the hallway and made the walls pop just a bit. (On a side note here. I intend to convert this image to Black and White ultimately. Taking the saturation slider to zero and then adjusting the color range sliders gives real-time feedback about the monochrome tonality and makes it easy to prep an image for conversion in Photoshop.)
HDR images often have too much saturation for my taste especially if you intend for them to have a natural look. My last adjustment was to reduce the overall saturation just a bit by pulling the slider down to 78. Although sometimes more saturation makes converting images to monochrome easier.
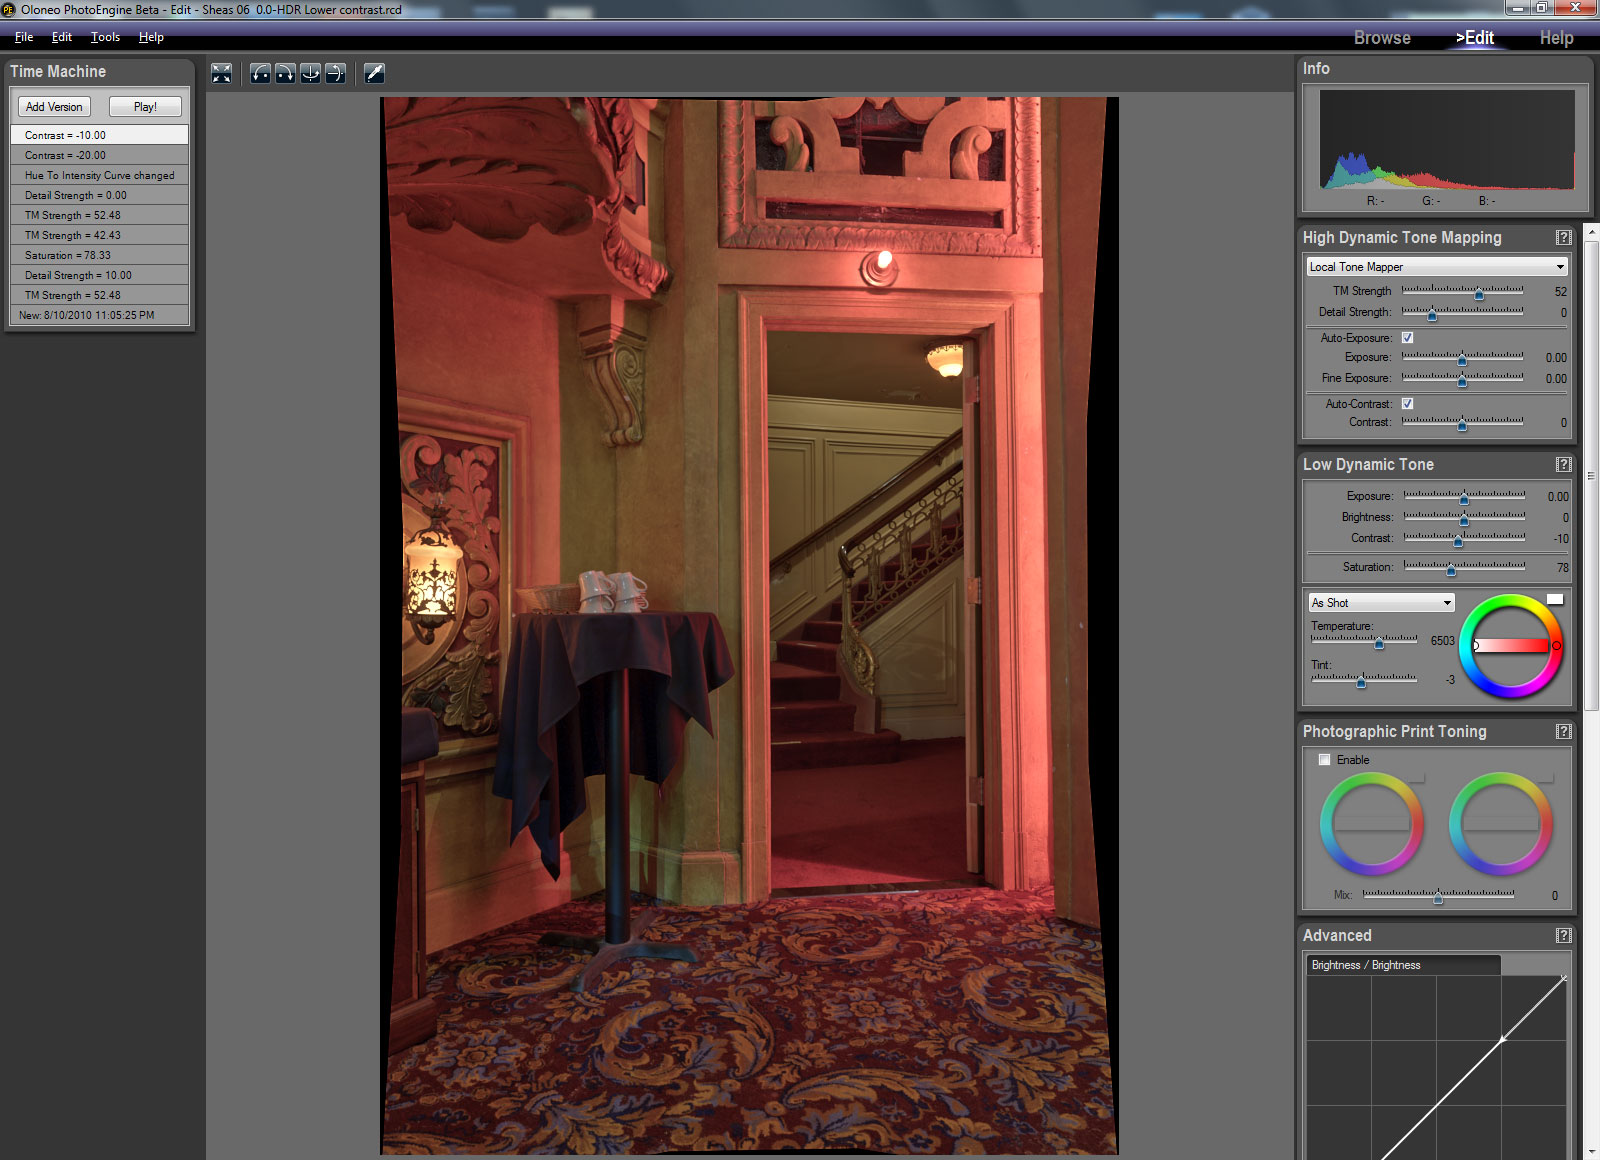 |
| Image with final adjustments |
So here is the image as processed in PhotoEngine and ready to go to Photoshop for post processing. I think it's the best pre-processed version of this image I have produced and a great starting point for Photoshop. It certainly was the easiest to produce.
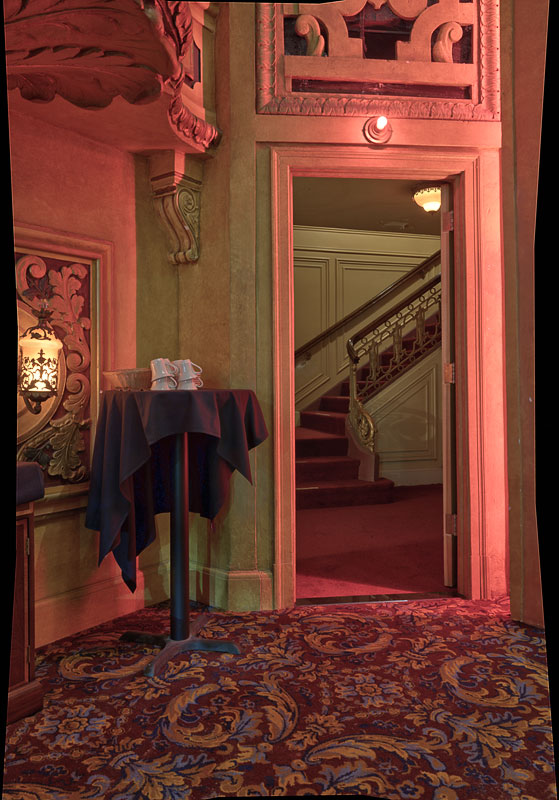 |
| Ready for Photoshop |
Some observations.
This was a brief look at a new HDR tool that is currently in beta but it should give you an idea of how simple it is to work with and what great results can be obtained with relative ease. The real-time updates are the best I have ever worked with and its ability to handle large files is superb. PhotoEngine could easily become a defacto part of my workflow.
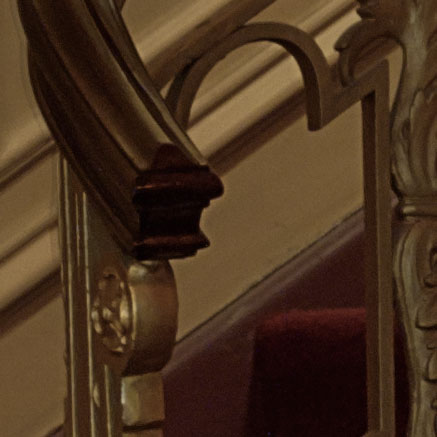
Garbage in - garbage out or what happens if you Lack EXIF information.
Applications like PhotoEngine rely on the EXIF data embedded in your images to get the exposure information. After I stitch my large images together they no longer contain the EXIF data. This means that the HDR software cannot automatically determine the relative exposure values for each image and it needs to be manually entered.
The first time doing this with PhotoEngine I naively entered the information incorrectly and the resulting HDR had some very odd anomalies. While the sliders seemed to be working and doing what I expected I was seeing results in a few areas that didn't make sense. For example the lights which have a rich amber color to them were completely desaturated in the Tone mapped image. Also I simply could not achieve an acceptable level of local contrast without blowing out the highlights.
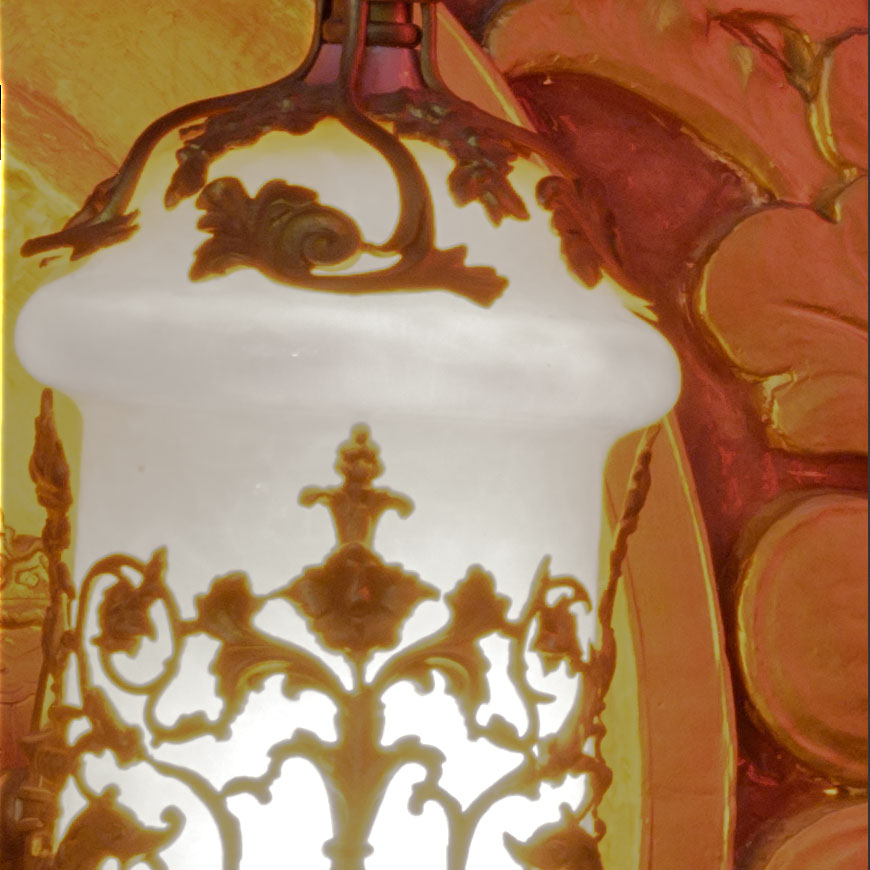 |
 |
| Two sections of the image showing the loss of color information in the highlights |
I was preparing some samples to send to Oloneo to illustrate what I was seeing. Not wanting to send 5.5GB over my internet connection I used some smaller images of the same scene that were not stitched and still had the EXIF data in them. To my surprise the lights in the image retained their beautiful coloration and detail. I happened to notice the values that PhotoEngine assigned for Relative Stops (from the EXIF information) and saw that they were the opposite of what I had assigned manually. For example: I assigned +1 to my one stop over exposed image and +2 to my two stop over exposed image. PhotoEngine saw my one stop over exposed image as -1 and my two stop over exposed as -2. Completely opposite of what I expected.
I reloaded my large files and manually assigned the same values that PhotoEngine did and the improvement was immediate and pronounced. I had clearly been using the application wrong. However in my defense I think it is more intuitive to assign negative values to under exposed images and positive values to over exposed images. If you don't have EXIF data make sure you enter the correct relative stops.
Links:
Oloneo PhotoEngine www.oloneo.com
Dynamic Photo HDR www.mediachance.com
Photomatix www.hdrsoft.com
Picturenaut www.hdrlabs.com/picturenaut/
|